

Superfetch is a Windows system process that has gone by many names over the years. It was known as “Prefetch” on Windows XP. Its service was implemented in Windows Vista and is now known as Sysmain on the new versions of Windows 10. In the end, the aim of every generation of the Superfetch service was the same: to boost Windows performance by preloading applications that you often use in RAM before you need to use them. Should i disable superfetch?
What is Superfetch?
In recent Windows 10 models, the superfetch new name now appears under the SysMain tag. It appears as a service host in the Task Manager: SysMain. If the previous version of Windows 10 or any Windows 7 or 8 version is installed, this will appear as the Service Host: Superfetch service in the Task Manager. This service operates in the background (with very little CPU power) and explores how much RAM you use and which applications you operate most often. Any applications that the service recognises as “often used” will start preloading the application into RAM. The next time you run the app, it will start much faster.
You may worry that the Superfetch service uses your entire RAM, but it doesn’t. The focus of the service is preloading applications into unused RAM. This does not report the amount of memory used. If you open Task Manager, go to the Processes tab, and display your memory usage, you can see this. While the service uses all unused RAM with preloaded applications, 100% of the consumed RAM has not yet been displayed. This is because Superfetch runs in the background and unlocks any leftover RAM that it uses for other active tasks if you need to use the memory.
Do you have Superfetch (Sysmain) to kill?
In general, Superfetch service doesn’t have to stop working. It requires very little CPU and uses only unused RAM. All this is not obvious to the general consumer. However, there were reports in Microsoft user forums that sometimes lead to performance problems due to the Superfetch missing (Sysmain) process. Some of the problems mentioned include:
• Daily 100% use of the disc.
• Overheating to shutdown the machine.
• Slow boot time while your machine is running.
• Superfetch could use more CPU and RAM on poor hardware than you would like.
• Has been known to cause game performance problems.
The most popular problem is the 100 percent disc use problem.
If you disable Sysmain, the issue can be fixed. Since Superfetch is just a device optimization feature, Windows will not be harmed if the service is stopped. However, you might find that it might take a little longer than normal to start your favorite applications.
How to disable Superfetch windows 11?
If you don’t encounter performance issues or other problems, Superfetch (Sysmain) is a good idea to run. It is a helpful process that reduces the time it takes to start programs you use often dramatically. However, you can try to deactivate Superfetch by experiencing high hard drive consumption, persistent memory problems, or poor overall performance to see if it fixes the problem. If so, leave the service-disabled.
If not, turn it on and begin troubleshooting.
Superfetch (Sysmain) disabled on Windows 10:
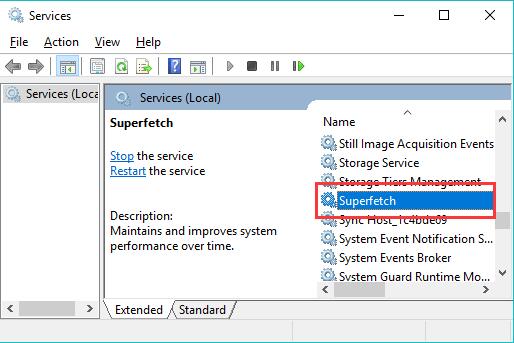
1. Choose the Start menu, form services, and pick the Services application. You can also tap Windows + R, form services. MSC and tap Enter.
2. Scroll to SysMain in the Services app, right-click the service, and select Stop. If you run an older version of Windows, right-click SuperFetch and choose Stop.
3. You now need to stop restarting the service when you start Windows.
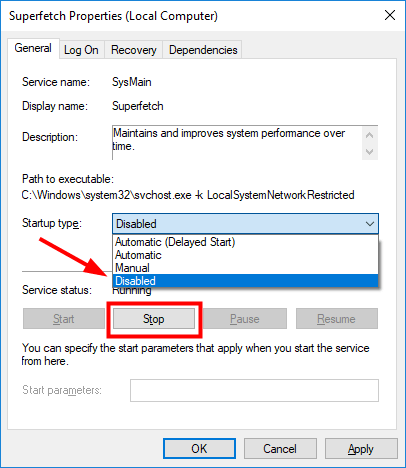
When the service is halted, right-click again and pick Properties.
4. In the dropdown form of initialization, pick Disabled.
Now you have permanently switched on the SuperFetch (SysMain) service and won’t restart the next time you start your machine.
Disable Registry Editor Disable Superfetch (Sysmain)
The Registry Editor is an alternative to using a Task Manager to disable Superfetch on Windows 10. Before you start doing something inside the registry, make sure you first take a full registry backup if anything goes wrong.
If you are ready:
1. Choose the Start menu, type Regedit, and pick the Registry Editor program.
2. Navigate to HKEY LOCAL MACHINE > Device > CurrentControlSet > Control > Session Manager > Memory Management > PrefetchParameters in the Registry Editor.
3. You should see a key called EnableSuperfetch in this section.
Right-click and select Shift.
4. Adjust the Value data field to 0 in the DWORD window that appears and select OK. When you’re done, you should close the Registry Editor.
The Super Fetch (SysMain) service on your device will be disabled by this registry entry. However, before this registry setting takes effect, you will need to restart your Windows device. Switch Super Fetch (SysMain) on or off with Prompt Command. If you prefer to operate with the command prompt, you can activate or disable the Super Fetch service using some simple commands. Open the command prompt first in admin mode, then use the following commands:
• Allow sc: start=auto setup and start sc “SysMain”
• Disabled: sc stop “SysMain” & sc setup “SysMain”
Note: In the above commands, if you are using an older version of Windows, substitute “SysMain” with “Super Fetch.”
Open it with administrator rights if you prefer PowerShell and use the following commands:
• StartupType Automatic -Status Running Enable: Set-Service name “SysMain”
• Disable: Stop-Service -Force -Name “SysMain;” Set-Service -Name “Systems” This solution can be much quicker and easier than the Task Manager or the Windows registry.
What if the problem isn’t fixed?
If you cannot fix your problem by disabling Super Fetch (SysMain), something else could be the root of the problem. If you still have a 100% drive use, you can need to upgrade to a larger drive or upgrade to an SSD drive. SSD drives are now very cheap, with data transfer speeds far higher than conventional hard drives. If you have Processor problems, then explore other CPU troubleshooting tips to chew the culprit on your CPU tools.